Short post again, may be more of these.
Just learned this trick this morning, when dipping metal figures, like flesh hounds, don't try and flick the dip off. They will snap and either break or fly off a 9th story balcony and then definitely break. Use a can of compressed air, like the ones used to clean dust from a PC, and gently pulse the trigger while moving the figure around. Worked out quite well for me. Just be careful not to use too much air on one spot or hold the nozzle too close the the figure.
Tuesday, June 28, 2011
Monday, June 27, 2011
Warhammer Fantasy Campaign
This week we started a Map based Warhammer Fantasy Campaign, I believe its going to be a blast, I already have two matches this week, one versus Trolls (Warriors of chaos) and another versus Skaven. As of current my Warhammer fantasy army is undefeated, and I eagerly anticipate a loss or two. If its going to happen it will most likely happen in this Campaign.
Sunday, June 26, 2011
Could a fine cast Bloodthirster be on the way?
I was looking through the new storms of magic wizards and noticed that the Bloodthirster while listed does not have a price or option to buy online. See for yourself. Could this mean a new fine cast Bloodthirster, and if so will they be gracing us with a new sculpture as well?
On the other hand I just looked in the Daemons section and found him listed with a price. I guess we will have to wait and see.
Upon further digging its rumored to be in the second wave of fine cast coming in August. One day I will learn to finish a post before publishing it.
On the other hand I just looked in the Daemons section and found him listed with a price. I guess we will have to wait and see.
Upon further digging its rumored to be in the second wave of fine cast coming in August. One day I will learn to finish a post before publishing it.
Postal strikes and ambitious goals
Well I said I would do a post on my land raiders progress, however we have a postal strike up here and the electronics I ordered are delayed. So instead of Working on my Salamanders centerpiece, I'm going to make the Ambitious attempt to finish 100% my Daemons army. If I manage to do this, this will be my first fully painted, based army of any significant point value in my 9 years of this hobby.
Sunday, June 19, 2011
Experiencing technical Difficulties
Do not be allarmed, I am still here.
The liquid cooling system in my computer ruptured a gasket and fried my mainboard and video card. (I got lucky)
There is also a postal strike up here in the great white north so as soon as my parts come in I will be posting my land raider conversion.
In regards to 44 days of blood, I met my goal of finishing my bloodletters so YAY!
Friday, June 3, 2011
How To: Dipping bloodletters
Hello all,
This will be my very first how to so be kind. I decided to dip the majority of my bloodletters one day as I sat there looking at all 60 of them on my desk, It was a massively daughting task, a little peeked about it I thought back to my local hobby shop where they suggested Dipping. Its really good for organic models, done right it can look good and you can push out a huge hoard in a week and a bit.
So Dipping huh, Well here is what you will need in no particular order.
 Assemble your bloodletter and make it red, either by hand or by spray can, If you use a gloss Finish spray paint you will need to scuff it up as the stain may not adhere to the paint right when you dip it.
Step 2:
 Paint the the horns, spikes, tongue, claws and spine fins Black. Touch up any red spots you hit with black.
Step 3:
 Paint the sword blade bolt gun metal, the hilt Dwarf bronze, and any horn caps dwarf bronze.
Step 4:
(see above pic)
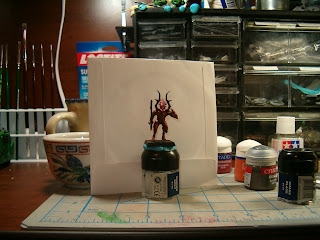
Dot every raised bump and khorne scarification marking with solar orange, this takes time and patience.
Step 5:
(see above pic)Mount on flying base with super glue let cure for minimum of 15 minutes.
Step 6:
Dip bloodletter in stain after thoroughly shaking the can.
Step 7: placing the stem of the base between your thumb and fore finger spin the bloodletter upside down in a box or bucket for about five or six seconds.
Step 8:

Place flying base stem down inside a beer bottle outside or in a well vented area to let dry. Being Canadian I was easily able to find 20 empty bottles laying around, If you don't have bottles you can punch holes in a box for the stems to fit in, or even drill out a holding rack made of wood. The important part is keeping the bloodletter upright while it dries.
We had one made already to see how it looks, I have noticed that dipped models do look better in person then on camera, I'm also horrible at taking pictures.

Some safty tips.
Now as for stains, any brand will work as long as it meets these rules: Its a 1 step stain and varnish(finish), and its not water based. The colour depends on preference but I found Walnut to be perfect for what I use it for.
This will be my very first how to so be kind. I decided to dip the majority of my bloodletters one day as I sat there looking at all 60 of them on my desk, It was a massively daughting task, a little peeked about it I thought back to my local hobby shop where they suggested Dipping. Its really good for organic models, done right it can look good and you can push out a huge hoard in a week and a bit.
So Dipping huh, Well here is what you will need in no particular order.
- A 1 step stain & polyurethane wood stain ( I use Minwax Polyshades Antique Walnut)
- A bloodletter or two
- Either white spray primer a large brush and GW blood red paint
- OR A mate finish cherry red spray paint (not oil based)
- GW Foundation Macharius Solar Orange Or Equivalent
- GW Dwarf Bronze Or Equivalent
- GW BoltGun Metal Or Equivalent
- GW Chaos Black Or Equivalent
- small Flying bases or something similar with a flat surface and a stem
- Super glue
- A box or bucket

Step 2:

Step 3:

Step 4:
(see above pic)
Dot every raised bump and khorne scarification marking with solar orange, this takes time and patience.
Step 5:
(see above pic)Mount on flying base with super glue let cure for minimum of 15 minutes.
Step 6:
Dip bloodletter in stain after thoroughly shaking the can.
Step 7: placing the stem of the base between your thumb and fore finger spin the bloodletter upside down in a box or bucket for about five or six seconds.
Step 8:

Place flying base stem down inside a beer bottle outside or in a well vented area to let dry. Being Canadian I was easily able to find 20 empty bottles laying around, If you don't have bottles you can punch holes in a box for the stems to fit in, or even drill out a holding rack made of wood. The important part is keeping the bloodletter upright while it dries.
We had one made already to see how it looks, I have noticed that dipped models do look better in person then on camera, I'm also horrible at taking pictures.

Some safty tips.
- Do this out doors or in a well ventilated area, the fumes while drying can be toxic and they just plain stink. You also ideally want to keep the miniatures out in the open standing vertical for up to two weeks to allow the polyurethane to harden all the way, You can play with the miniatures up to 8 hours after dipping just be careful as they can smudge or dent or chip.
- Wear safety glasses so you don't get the dip in your eyes as you spin and flick it about.
- Always read the instructions and follow additional safety tips from the manufacturer.
Now as for stains, any brand will work as long as it meets these rules: Its a 1 step stain and varnish(finish), and its not water based. The colour depends on preference but I found Walnut to be perfect for what I use it for.
Subscribe to:
Posts (Atom)